A continuation of my solo campaign. I am finally playing on a new gaming mat for added visual affect, so no more bland table surface. This is a cloth mat, under which I placed some styrofoam hills. I like the way it blended out the terrain, making more gentle slopes in this case.
Ruleset: Song of Blades and Heroes
After a crushing defeat in the convey mission, the Guardsmen get word of the Raiders pressing deeper into the kingdom. Scouts have seen a war party converging in on a sleepy little hamlet in the foothills. Word is sent to rally some soldiers to support the village, and rescue the residents and escort them out of harms way. However, due to the staggering losses they have suffered thus far, the Guardsmen are scattered and unable to arrive in organized fashion. Will they be able to race to the village in time to stop the impending slaughter?
For this game, the Raiders will arrive in the Northeast corner of the table, and race to the village. There are 4 buildings to search, with a total of 6 residents in town that need to be saved or eliminated for the game to end. As the Guardsmen units are scattered and unable to rally effectively to battle, 6 counters are placed along the table edges to represent entry points. At the start of each Guardsmen turn, a D6 is rolled for each model, with them appearing on a 5+ roll, and a D6 then determining each model's arrival point.
To find the villagers, a model must move into contact with the building near the doorway and spend an activation to flush out any inhabitants. On action, D3 models deploy around the doorway, counting as activated for that round. Once with 6 villagers have been identified, or all 4 buildings have been searched, no more villagers will appear. Villagers count as Peasants from the SoBaH revised rulebook, with Combat 0 and Activation of 5+.
As the villagers and Guardsmen are defending their homes, I decided that the humans would be immune to panic this game, ignoring morale tests on Gruesome Kills and on death of a Leader model.

Raiders arriving near the village. 1 Gnoll Chieftain (great axe), 2 Champions (great swords), 2 Archers, and 3 Warriors

Initial Set up, with Raiders approaching from the northeast corner.

On their first activation, A Guardsmen warrior arrive from the southeast, and Mage and Archer from the west near the village.

The stalwart archer enters the hamlet as the Raiders crest the hill and begin their attack.

The wizened Mage rushes to the western hovel and discovers 3 villagers hiding inside.

The Archer fires upon the nearest Champion and causes him to stumble, buying valuable time.

A Warrior arrives from the southwest, while another joins the defense from the northwest, coming to help the archer against the approaching marauders.

Raiders move to engage the Guardsmen to the northwest of town.

The Guardsmen Captain enders from the southeast, far from the action.

Two Champions charge into the lone Guard warrior on the north, backed by an archer moving to suppress any more approaching humans
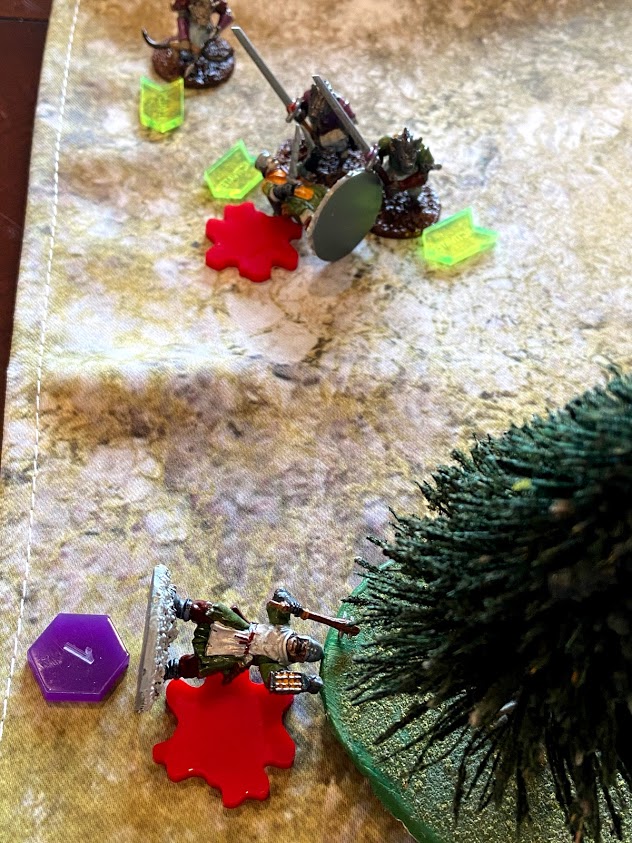
The Champions quickly overwhelm and dispatch the Guard, while the archer fells another warrior that was trying to come to his aid.

At the eastern building, a Raider scares 2 villages from their beds.

At the western hovel, a Gnoll warrior engages the villagers before they could scatter to safety.

Raider archer moves to fire upon the civilians, hoping to ready an easy meal for after the action.

On the east side, Gnolls engage the villagers, but the Guardsman rushes to their protection.

One villager manages to get back from the confusion at the western building

Out guard archer manages to knock the Raider Chieftain with an arrow as he tried to rush towards easier prey.

A villager falls to the ferocious beast.
The Raiders knock down the Warrior and villager, but fail to kill either. The other villager takes a swig from his bottle, believing it may be his last.

On the north side of town, the Gnoll Champions team up to take out the Guard archer, as their Chief recovers.

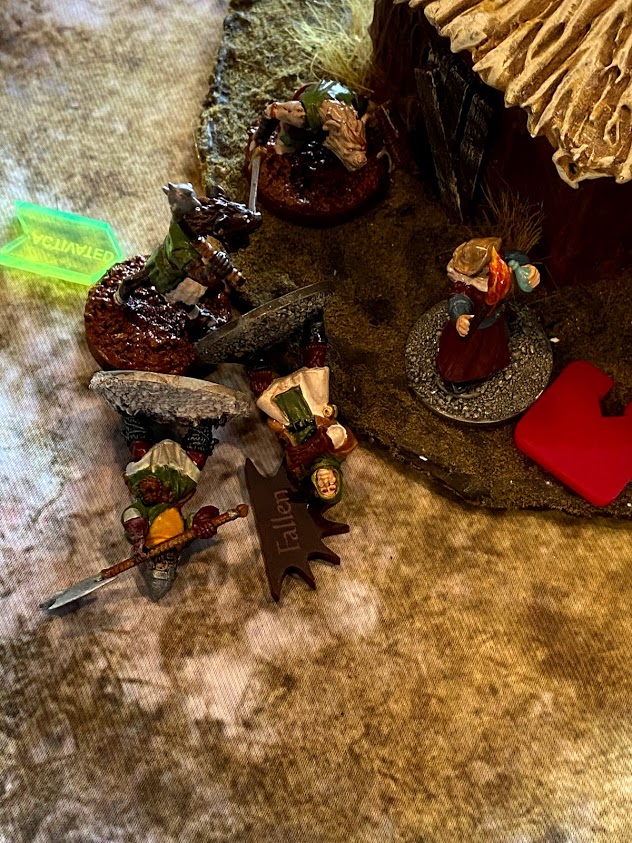
At the eastern building, the Captain arrives and inspires the villagers and Guard to fell one of the raiders.

To the west, the guardsmen moves in to tie up the Raider before he can get to another villager...

and manages to dispatch him with little difficulty.

At the northern dwelling, the Raider Chieftain flushes out the last of the villagers, who ducks the heavy axe and slips back.

A view of the larger battle. 1 Villager is trying to scramble up the hill, while combat continues to rage throughout the hamlet.

At the eastern house, the Raider trips the villager before the warriors could intervene.

Raiders close in on the western house, while the Captain moves to take out the Raider the the east house, but gets tripped up. Another Villager starts to get away from the house, moving south.

Raider archer neatly places an arrow through the civilian who was evading the Chief... The Chief will likely want revenge for making him seem weak in front of the war party.

The Raider fells the Captain, splattering gore all over our whisky-drowned villager who can't pull away.

At the western house, a Champion charges and cuts down a hapless villager right in front of the man trying to defend them.

Dumbstruck by such vicious slaughter, the Guardsman is cut down by the second Champion entering the fray.

To the east, a Raider archer moves from the center to help with the pesky human warrior.

The Mage, who has proven to lack favor with the fickle winds of magic, catches an arrow to the neck as he tries to slow the beasts and allow the villagers more time to get away.

Moving south, one villager approaches the way out, while another is pursued by two of the raider scum right behind him. A short way away, the villager trying to scurry the hill is set upon by a blood thirsty Champion.

The villager manages to shove the Champion over on the steep slope!

The other Champions fells our drunkard on the other side of the south house.

In a desperate flight, 2 of the villagers manage to catch a break and flee the scene.

The last Guardsman, finally knocked down at the eastern house, marks the end of the game.
The Guardsmen managed to stall the Raiders long enough for 2 of the 6 villagers to get away to safety. While the entire band of defenders were stuck down, the grateful civilians decide to take up arms and join the fight in attempt to avenge their destroyed homes and murdered kin. Tales of the rescue spread through taverns, bolstering morale, causing more brave souls to take up the fight.
Post-game Thoughts:
Another fun game, with plenty of unexpected turns of events. I really enjoy the simplicity of this system, with its ability to turn the tide of the game at key moments with the tumble of a dice.
For this game, I was surprised at how pitiful the villagers were. I didn't expect them to do much in combat, but their 5+ activation made every attempt a real gamble. I found myself attempting just 1 activation with them, usually failing, and leaving them to mill about in place while battle raged around them. Often I would try them first, and just fail each of their rolls. A few times, I waited to use them later in hopes of trying more rolls, only to flub the activations of a soldier and turn things over early. In hindsight, having a second Leader model would have helped immensely, That +1 activation really makes it easier to do something, especially on such poor troops. It really didn't help that the Leader started so far away from the village, but such is luck.
I generally like taking a mage in most games, as the ability to transfix enemies is just so powerful, but I don't think a single spell went off this game.
As much as I like the back-and-forth nature of this game, with turns ending unexpectedly, I find it makes it hard to track or curate game events. Typically in other systems I have made events occur on game turn X, or games only lasting X number of turns, but neither really seems applicable in this case. I was going to try to make the odds of models appearing increase as the game went on, but got lucky enough with rolls that the 5+ on each attempt worked out fine. On the other hand, events triggered by approaching areas/tokens work just fine, and by playing solo, one can control the pace of the game fairly well.
Well, until next time!


Nice report, I need to stop sitting on this system and give it a whirl.
ReplyDelete